Introduction to M.A.R.C.H.: Controlling Massive Bleeding: Tourniquets
Controlling Massive Bleeding: Tourniquets
If applying pressure to an extremity wound does not stop the bleeding, apply a tourniquet.
If you are unsure if a tourniquet is needed, go ahead and apply one.
A tourniquet is a tool that stops bleeding because it applies pressure to the blood vessels that supply the extremity.
Once a tourniquet is applied, there will be no distal pulse (pulse on the extremity below the tourniquet), and the bleeding should stop. If bleeding has not stopped, you may need a second tourniquet.
Types of Tourniquets
There are three types of commercial tourniquets that are part of the Bureau of MED-issued trauma kits that you may see at a diplomatic post.
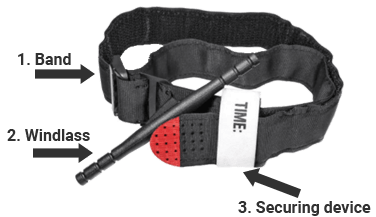
Combat Application Tourniquet (CAT)
This type is given to all Department of Defense service members. It has a Velcro strap, plastic windlass, and a c-shaped securing device.
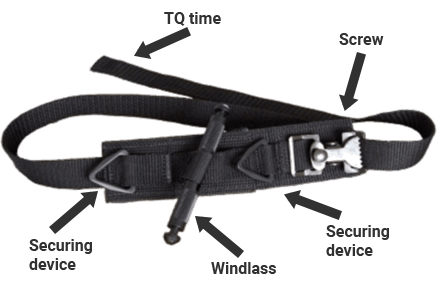
Special Operations Forces Tactical Tourniquet (SOFTT)
This type is easy to apply to yourself if you need it. The strap on this type of tourniquet is only 2.5 centimeters wide, and the screw needs to be screwed down or the strap may not stay tight.
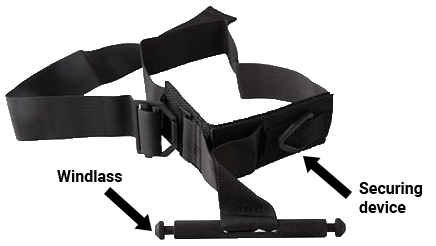
SOFTT Wide
The SOFTT Wide is also easy to apply to yourself. The band on this tourniquet is 3.8 centimeters wide and has a metal windlass. It also has two plastic triangles for a securing device. You only need to put the windlass into one of them.
Applying the Tourniquet
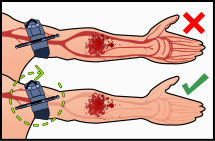
The best place to apply a tourniquet is high on the extremities because it is easier to compress the major blood vessels there.
Let’s look at the rules for applying a tourniquet.
Steps for Application
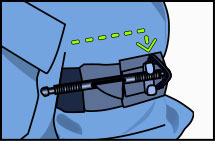
Place the tourniquet over the victim’s clothes, as high and tight as possible.

Spin the windlass until bleeding stops.
Secure the tourniquet using the applicable securing device.
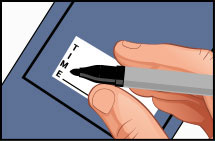
Make a note of when you put on the tourniquet so you can tell the medical professional how long the victim has had it on.
Learning Check
Let’s see how much you have learned so far.
Select the arrow corresponding to the area where you should place the tourniquet.
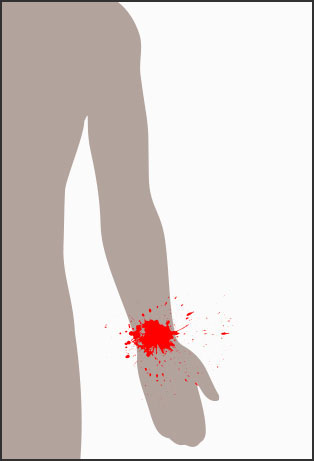
- Upper arm close to the armpit
- Just above elbow
- Just above wound on wrist
Select the arrow corresponding to the area where you should place the tourniquet.
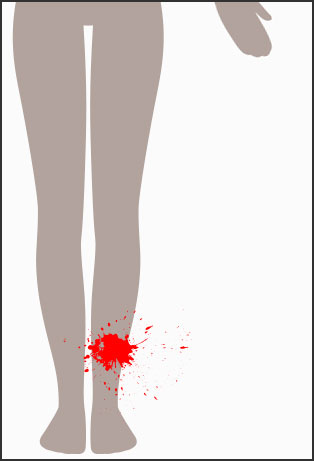
- Upper leg close to the pelvis
- Just above knee
- Just above the wound on the calf
Improvised Tourniquet
If you do not have access to any of the previously mentioned types of tourniquets, you can make your own using cloth material and a rigid stick or similar object.
To Apply the Tourniquet
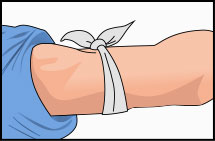
Place the material over the clothes as high as possible from the wound and tie a half-knot. (A half-knot is the same as the first part of tying a shoelace.)
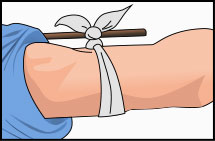
Place a stick (or similar rigid object) on top of the half-knot.

Tie a full knot over the stick.
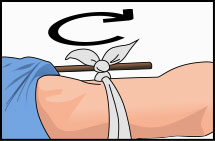
Pull away from the body as to not pinch the extremity and turn the windlass until the bleeding stops.
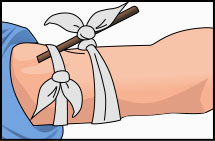
Secure the windlass in place so it does not loosen.
Make sure you:
- Place the material high on the limb and use a strong, soft material, like gauze bandages or clothing.
- Keep the material 4 to 7.5 centimeters wide—do not use wire or a shoestring.
- Tie an overhand knot.
- Place the object used as a windlass over the knot and tie a full knot.
In massive bleeding situations, you can use a tourniquet to save your life or the life of someone else.
Now that you have learned about how to control massive bleeding, we will discuss the second most urgent injury you should address, airway obstruction.